
How to Digitize Traditional Mexican Otomi Embroidery Patterns for Machine Stitching 
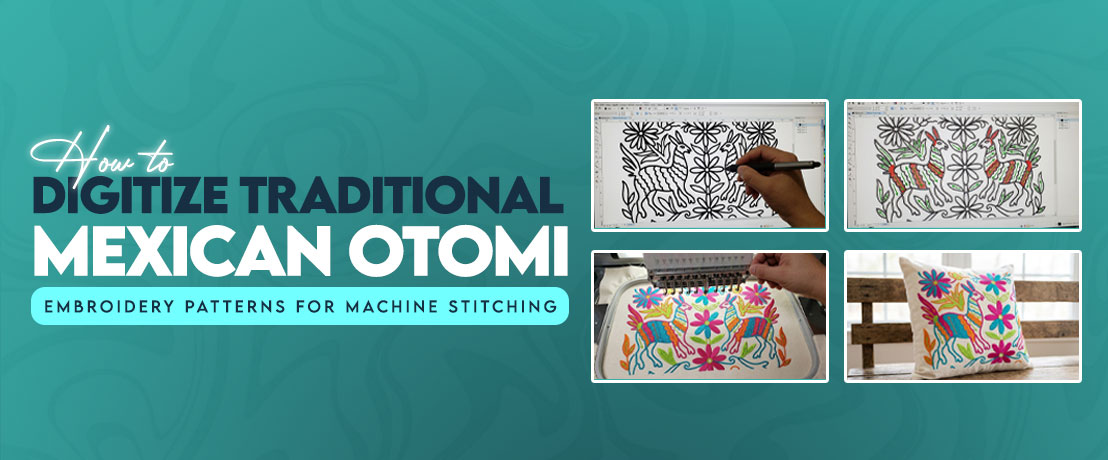 Some embroidery artwork looks simple until you have to turn every line, shape, and color area into stitches. That is exactly what happens with custom embroidery digitizing service work involving traditional Mexican embroidery patterns. The artwork may use large animals, flowers, leaves, and bold outlines, but those clean shapes need careful planning before they become machine stitches.
I have worked with many decorative designs where the biggest mistake was treating the artwork like a basic logo. Otomi-inspired artwork needs more attention to spacing, stitch direction, density, and small details. A good digitizer first examines the artwork, then builds stitches around how the design will actually sit on fabric.
What Makes Otomi Embroidery Unique (And Why It's Tricky to Digitize) 
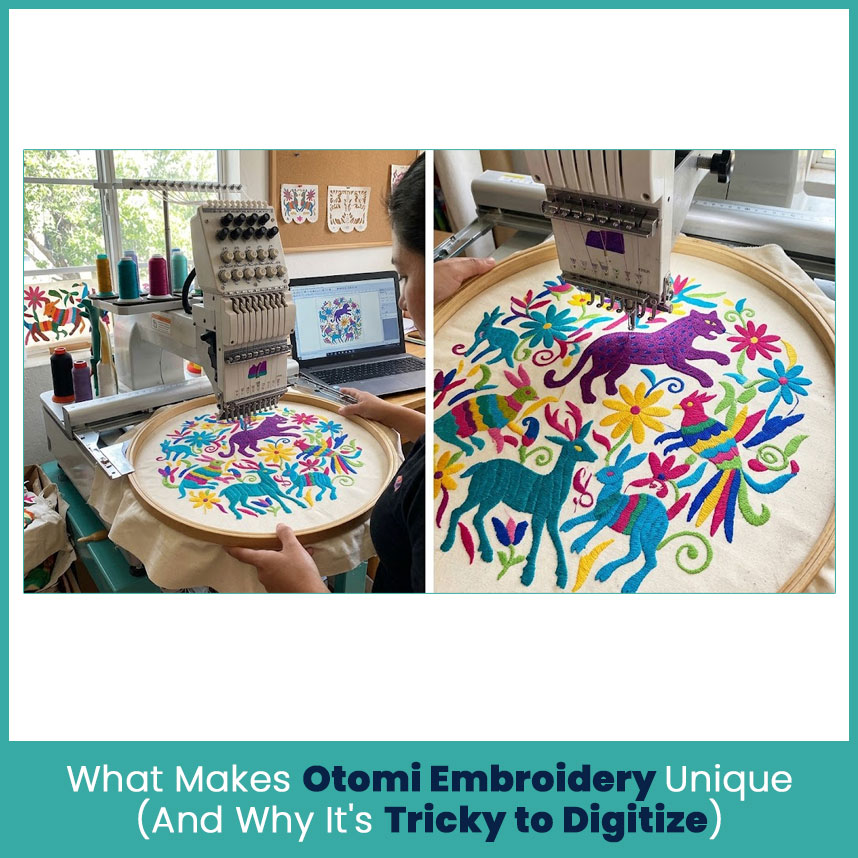 Otomi embroidery is known for lively compositions filled with animals, plants, flowers, birds, and other nature based forms. Many examples connected with Otomí communities in Hidalgo use embroidered cotton textiles, and museum collections show how these designs can combine animals and plant forms across a fabric surface.
The challenge starts when you move from a hand-drawn or hand-stitched appearance to machine embroidery. A needle can’t copy a painted line exactly. Every visible part needs a stitch plan.
The Bold Animal and Nature Motifs Behind Otomi Designs 
Large animal shapes give these designs much of their character. Deer, rabbits, birds, cats, flowers, leaves, and other natural forms can appear close together, sometimes with decorative details inside the main shapes.
When I prepare artwork like this, I look at the design in layers rather than trying to digitize everything at once.
I usually separate it into:
- Main animal or flower shapes
- Outer borders and decorative outlines
- Interior details
- Large background or fill sections
- Small leaves, dots, petals, and other accents
- Overlapping areas that need a clear stitch order
This approach keeps the design easier to edit later. It also prevents tiny details from getting buried underneath heavier stitching.
Why Flat Color Blocks Confuse Standard Digitizing Software 
A flat color area looks easy on screen, but software still needs to decide how stitches will start through that shape. A large shape with no shading can turn into a heavy block if the density is set too high. Another issue is direction. If every color area uses the same stitch angle, the finished embroidery can look flat and lifeless. Changing the stitch direction slightly can make separate shapes easier to recognize.
That’s why I never judge a digitized design only by its preview. I check how neighboring areas meet, where stitches begin and end, and whether the fabric has enough room between heavy sections.
Understanding the Structure of an Otomi Pattern Before You Digitize 
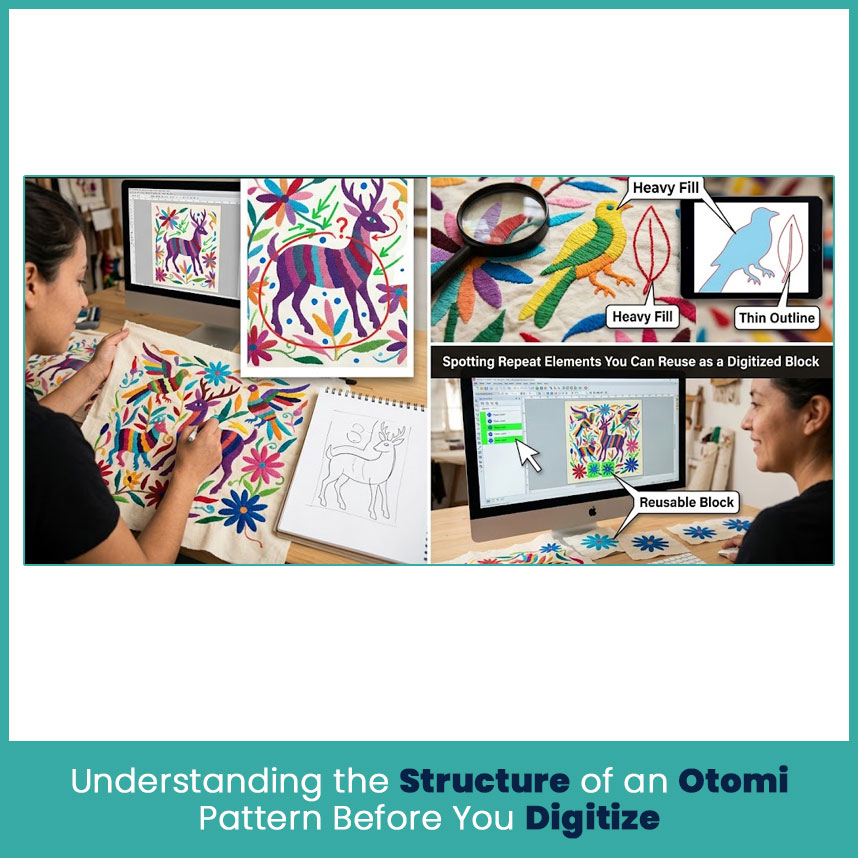 Before placing the first stitch, study the original artwork carefully. Look for the visual hierarchy. Which animal should catch the eye first? Which lines are decorative? Which shapes need solid coverage?
This small planning step saves a surprising amount of editing later.
Before placing the first stitch, study the original artwork carefully. Look for the visual hierarchy. Which animal should catch the eye first? Which lines are decorative? Which shapes need solid coverage?
This small planning step saves a surprising amount of editing later.
Breaking Down Outline Work vs Fill Areas 
Outlines and fills do different things. A fill gives a shape its body, while an outline defines its edge. If both use too many stitches, the design becomes unnecessarily heavy. For most Otomi style artwork, I first identify:
- Areas that need complete coverage
- Lines that only need definition
- Small details that need a narrow stitch path
- Shapes that can share a border
- Areas where one color sits directly against another
A clean outline does not always need to be thick. In a small design, a heavy border can close up the details and make an animal's face or flower center look muddy.
Spotting Repeat Elements You Can Reuse as a Digitized Block 
Some artwork contains repeated leaves, flowers, dots, or small decorative shapes. These pieces can save time when you build the design.
Instead of redrawing every repeated element, create one clean version and reuse it where the proportions remain suitable. Still, I check every copy after placing it. A repeated shape may need a slightly different stitch direction or size when it sits in another part of the composition. The best results usually come from treating digitizing as a design process rather than an automatic conversion.
Step-by-Step Process to Digitize an Otomi Design for Machine Embroidery 
 The best results usually come from treating digitizing as a design process rather than an automatic conversion.
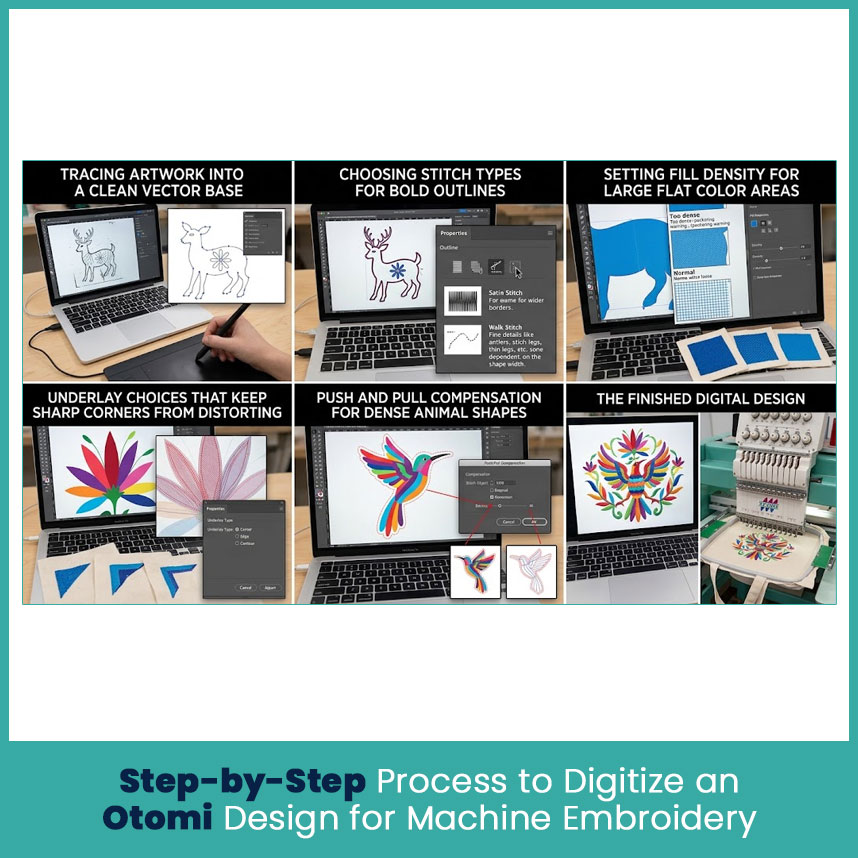
Tracing the Artwork into a Clean Vector Base
Start with the clearest artwork available. If the source image has rough edges, stains, compression marks, or uneven lines, clean those problems before creating stitch objects.
A vector base helps because:
- Curves become easier to control
- Shape boundaries stay clean
- Repeated elements become easier to manage
- Colors can be separated clearly
- Scaling becomes more predictable
Scaling becomes more predictable Don’t trace every tiny mark from a low-resolution image. Some marks belong to the original artwork but have no practical place in the embroidered version.
Choosing Stitch Types for Bold Outlines (Satin vs Walk Stitch) 
A satin stitch works well for wider borders, narrow filled shapes, and selected decorative outlines. It creates a smooth surface and gives a stronger visual edge.
A walk stitch makes more sense for very thin lines and fine details where a satin column would become too wide.
The choice depends on the actual size of the shape. I never select satin simply because the artwork has a bold line. At a small finished size, that same line may need a much simpler stitch structure.
Setting Fill Density for Large Flat Color Areas
- Large color blocks need enough coverage to look solid, but more stitches do not automatically create better embroidery.
- Too much density can cause:
- Fabric puckering
- Hard and bulky areas
- More thread consumption
- Increased stress around small shapes
- Loss of detail where colors meet
I normally look at the fabric, thread type, design size, and neighboring objects before deciding on density. A cotton tote and a lightweight shirt should not receive exactly the same settings.
Underlay Choices That Keep Sharp Corners From Distorting 
Underlay gives the top stitches a more stable base. It also helps control the fabric before the visible stitches cover the area. For sharp corners, the underlay needs careful placement. Too much underlay can make a small corner thick, while too little support can leave the edge unstable. The goal is simple: support the top layer without making the finished shape heavier than necessary.
Push and Pull Compensation for Dense Animal Shapes 
Large animal bodies, long leaves, and other dense shapes can shift slightly as stitching builds. Pull and push compensation accounts for that movement when the digitizer creates the embroidery objects.
I pay special attention to long edges and narrow points. If the artwork has a sharp ear, tail, beak, or leaf tip, a small adjustment can make the finished outline much cleaner.
This becomes especially important when several dense shapes sit close together.
Common Mistakes When Digitizing Mexican Otomi Patterns 
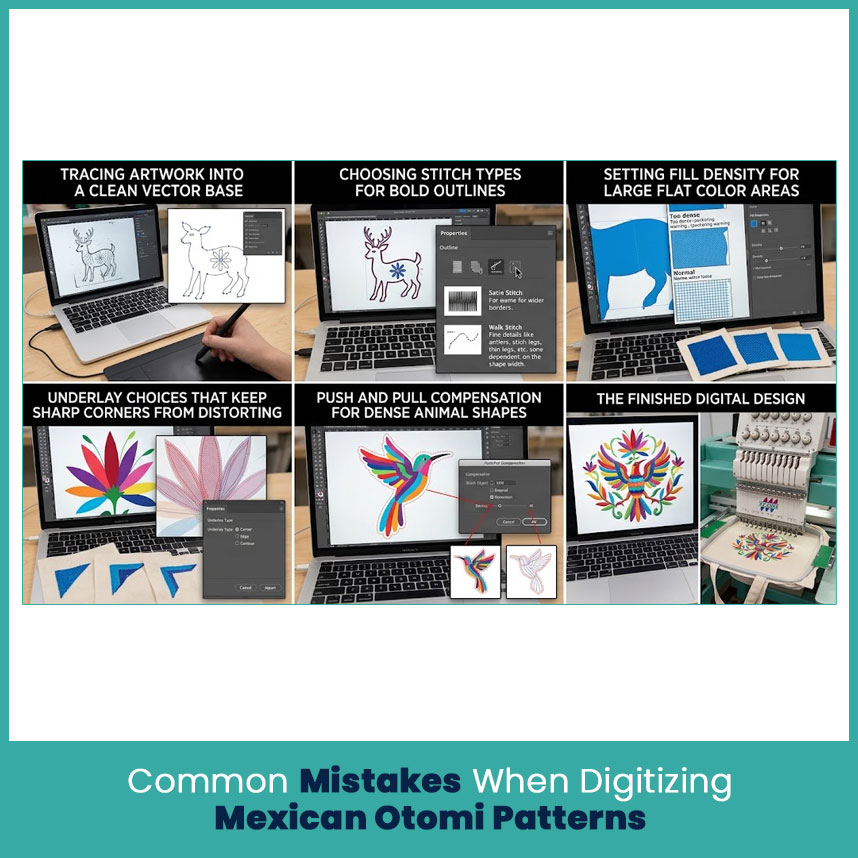 Even a simple looking design can lose its character when the stitch plan ignores the original proportions.
Overloading Stitch Count on Small Motifs Small flowers and animal details don’t need the same stitch structure as large central shapes.
If you force too many stitches into a tiny area, the stitches can cover each other and close the opening between details.
For small motifs, I usually simplify rather than shrink every detail from the original artwork. A good rule is to ask:
- Can the detail remain visible at the final size?
- Does it need its own color?
- Can a line become a single stitch path?
- Should a tiny shape be removed or enlarged slightly?
That type of editing protects the overall look.
Ignoring Fabric Type When Setting Density 
Fabric changes how stitches behave. A stable woven fabric can handle a different stitch structure than a soft knit.
Before finalizing the file, consider:
- Fabric weight
- Fabric stretch
- Surface texture
- Design size
- Stabilizer support
- Number of overlapping layers The same design may need small adjustments when moving from a firm canvas piece to a soft garment.
Best Fabrics and Backing for Otomi-Style Machine Embroidery
A stable base gives detailed embroidery a better chance of keeping its shape. Cotton, canvas, denim, and other stable woven materials can work well for larger decorative pieces when the design settings match the fabric.
Garments need more care because the fabric may stretch or move during stitching.
Why Stabilizer Choice Changes With Design Size 
A small design doesn’t place the same load on fabric as a large, heavily filled composition.
For a larger Otomi-style design, the stabilizer needs to support the fabric across the full embroidered area without making the finished piece unnecessarily stiff. I consider:
- Fabric stability
- Design dimensions
- Stitch count
- Density
- Number of layers
- Whether the item needs to remain soft after embroidery Testing a small section first can save an entire garment or decorative piece from an avoidable mistake.
Digitizing Otomi Patterns for Apparel vs Home Decor Projects 
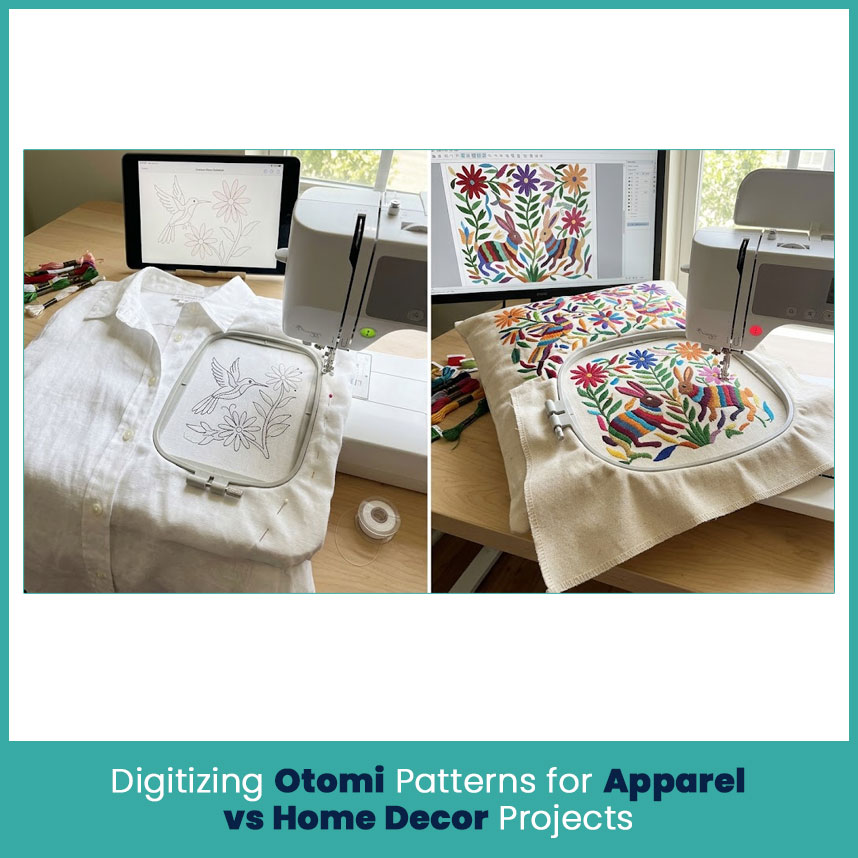 The final use changes the way I prepare the file.
Adjusting Stitch Count for Wearable Pieces 
Shirts, jackets, and other garments move with the wearer. Heavy embroidery can make a lightweight garment uncomfortable or cause the fabric to pull around the design.
For apparel, I usually simplify tiny details and control overlapping areas more carefully.
A wearable design should keep its visual character without becoming unnecessarily dense.
Scaling Considerations for Larger Decor Pieces (Pillows, Wall Art) 
Pillows, wall pieces, bags, and other home decor items can support larger artwork. That gives you more room for animal details, flowers, borders, and decorative elements.
However, increasing the size doesn’t mean every tiny detail should simply become larger.
At a larger scale, I look for:
- Balanced spacing between motifs
- Consistent outline width
- Smooth transitions between color sections
- Proper stitch direction
- Comfortable density across large areas
The final size should guide the stitch plan from the beginning.
FAQs 
Can Otomi embroidery be accurately digitized using free digitizing software?
Yes, basic software handles simple designs, but detailed artwork needs careful control of stitch types, density, underlay, sequencing, and compensation.
What's the best stitch type for Otomi patterns, satin or fill?
Neither works for every part. Satin suits selected outlines and narrow filled shapes, while fill stitches work better for larger solid areas.
How many stitches does an average Otomi design typically have?
There is no fixed average. Stitch count changes with artwork size, detail level, fabric, density, and the number of filled areas.
Can digitized Otomi files be reused across different fabric types?
They can sometimes be reused, but settings may need adjustment for fabric weight, stretch, stabilizer, density, and design size.
Author Bio
Matthew Davis
Senior Embroidery Digitizer
I'm Matthew Davis, a skilled embroidery digitizer with more than 15 years of practical experience. I specialize in logo digitizing, 3D puff embroidery designs, applique digitizing, custom embroidery digitizing, and working with difficult fabrics. Over the years, I have worked with different fashion brands and production teams worldwide. I always share simple tips and useful techniques to help both beginners and businesses improve their embroidery work.
.svg)